Hosanna Branch Wavers Instructions
Our friend, Rev. Heather Riggs gathered these instructions from Hosanna Branch Wavers from https://mommysnippets.com/hosanna-branch-wavers/ to create your own Hosanna Branch wavers at home!
Scroll down to print a pdf!
Supplies for 2 Hosanna Branch Wavers:
Instructions:
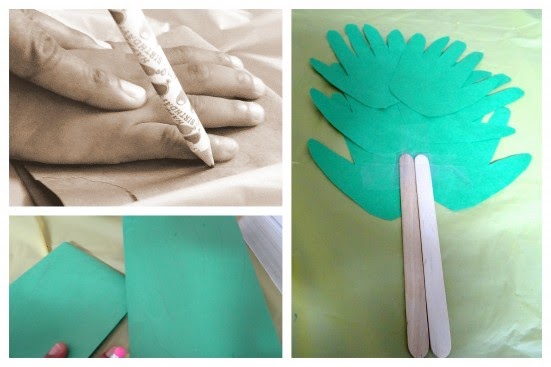
1. Outline your child’s hand on the green construction paper. (Make a minimum of 6 outlines. 8-10 will make your child’s waver really wave!)
2. If your child is old enough to use a pair of scissors, allow them to cut around the handprint outlines. Else leave this part to the adult supervising the craft.
3. Now stick the hand print outlines two on each row and build on upwards.
4. Finally tape two ice-cream sticks to the bottom of the “branch” securely with the cello-tape. (I stuck two ice-cream sticks on top of each other and made the kids’ handles thicker.)
Scroll down to print a pdf!
Supplies for 2 Hosanna Branch Wavers:
- Green construction paper- 4 sheets
- 4-8 ice-cream/pop sticks
- Cellotape
- A pencil
- Scissors
- A glue-stick
Instructions:
1. Outline your child’s hand on the green construction paper. (Make a minimum of 6 outlines. 8-10 will make your child’s waver really wave!)
2. If your child is old enough to use a pair of scissors, allow them to cut around the handprint outlines. Else leave this part to the adult supervising the craft.
3. Now stick the hand print outlines two on each row and build on upwards.
4. Finally tape two ice-cream sticks to the bottom of the “branch” securely with the cello-tape. (I stuck two ice-cream sticks on top of each other and made the kids’ handles thicker.)
| palm_sunday_family_activities_for_home_celebrations.pdf |
